我也来做PSP游戏[3] - 为游戏增添色彩
😱看了两篇文章还在输出黑色背景和白色英文字母,是不是有点失望,那么今天我们来点新奇有趣的东西,为游戏添加色彩!
首先我们需要在第一第二篇代码的基础上稍作修改。
在文件头部引入用于显示的头文件
#include <pspdisplay.h>加入如下宏定义,他们分别表示屏幕宽度,屏幕高度,扫描线大小和ARGB颜色移位函数
#define SCREEN_WIDTH  480
#define SCREEN_HEIGHT  272
#define SCAN_LINE_SIZE  512
#define ARGB(a, r, g, b) (a<<24|b<<16|g<<8|r)
在main函数前添加控制程序主循环的变量
int done = 0;添加屏幕地址
u32* pVRAM = (u32*)(0x04000000+0x40000000);添加以下函数,功能分别是在指定像素点上显示颜色和在指定区域填充颜色
void Plot(int x, int y, u32 color)
{
	u32* p = pVRAM + y * SCAN_LINE_SIZE + x;
	*p = color;
}

void FillRect(int x, int y, int width, int height, u32 color)
{
	u32* p = pVRAM + y * SCAN_LINE_SIZE + x;
	int i, j;
	for (j = 0; j < height; j++)
	{
		for (i = 0; i < width; i++) // plot one row
		{
			*(p + i) = color;
		}
		p += SCAN_LINE_SIZE; // move pointer to the next row
	}
}
修改main函数
int main()
{
	pspDebugScreenInit();
	SetupCallbacks();
	//设置屏幕显示模式,0:颜色使用ABGR格式
	sceDisplaySetMode(0, SCREEN_WIDTH, SCREEN_HEIGHT);
	while (!done)
	{
		// 这里画三个点
		Plot(50, 20, ARGB(255,255,0,0)); // a red pixel
		Plot(100, 20, ARGB(255,0,255,0)); // a green pixel
		Plot(300, 20, ARGB(255,0,0,255)); // a blue pixel

		//这里画三个矩形
		FillRect(50, 100, 20, 20, ARGB(0,255,0,0)); // a red rectangle
		FillRect(100, 150, 20, 20, ARGB(255,0,255,0)); // a green rectangle
		FillRect(300, 200, 20, 20, ARGB(255,0,0,255)); // a blue rectangle

		//如果不暂停一下,有可能会导致psp的home键点击无响应
		// if we don't have a small pause at all, PSP may no response to the "HOME" button click
		sceDisplayWaitVblankStart();
	}
	sceKernelExitGame();
	return 0;
}编译程序,复制EBOOT.PBP放进psp中的psp\game\xxx(名字随便起)文件夹下。
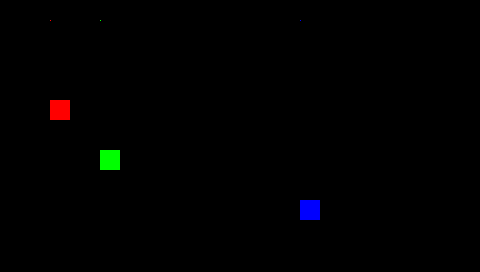
打开psp找到程序运行,看到如下图片证明你已经成功为你的程序游戏添加色彩了。
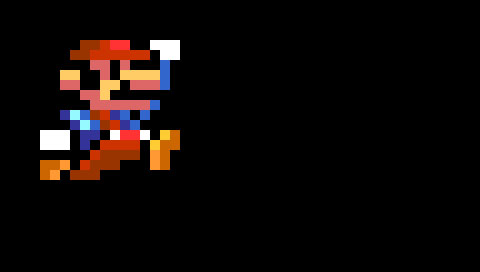
只是画方形太无聊了吧,或许有同学会这么说,好吧,我们来画幅像素图。就以马里奥为主角!
首先我们需要定义马里奥的颜色索引
int mario_color[14] = {
	0x00000000,
	0xff000000,
	0xffffffff,
	0xff003399,
	0xff0033cc,
	0xff3333ff,
	0xff6666dd,
	0xffcc6633,
	0xff66ccff,
	0xff993333,
	0xfffff996,
	0xff33ccff,
	0xff0066cc,
	0xff3399ff
};
定义马里奥各像素的颜色,依据颜色索引取色,0对应0x00000000,即透明
int mario_data[16][16] = {
	{0,0,0,0,0,1,1,1,1,1,0,0,1,1,1,0},
	{0,0,0,0,1,3,3,4,5,5,1,1,2,2,2,1},
	{0,0,0,1,3,3,4,4,4,4,4,4,1,2,2,1},
	{0,0,0,1,1,1,6,6,1,6,1,1,1,7,1,0},
	{0,0,1,8,8,1,1,6,1,8,8,8,8,7,1,0},
	{0,0,1,6,6,1,1,8,8,1,6,6,6,7,1,0},
	{0,0,0,1,1,6,6,8,1,1,1,1,1,1,0,0},
	{0,0,0,0,1,1,6,6,6,6,6,6,7,1,0,0},
	{0,0,1,9,10,7,3,4,9,7,1,7,1,0,0,0},
	{0,1,1,1,9,10,7,3,4,9,7,1,1,1,1,0},
	{1,2,2,2,1,9,9,1,2,5,5,2,1,11,12,1},
	{1,2,2,2,1,9,1,4,4,4,4,1,11,12,12,1},
	{0,1,1,1,1,1,4,3,3,3,3,1,13,12,1,0},
	{1,12,12,13,1,4,3,3,3,1,1,1,13,12,1,0},
	{1,12,13,1,3,3,3,1,1,0,0,0,1,1,0,0},
	{0,1,1,0,1,1,1,0,0,0,0,0,0,0,0,0}
};
注释掉绘制三个矩形和三个点的代码行,在main函数的while循环里添加以下代码
int offset = 30;
int mario_width = sizeof(mario_data[0]) / sizeof(int);
int mario_height = sizeof(mario_data) / sizeof(mario_data[0]);
int i,j;
for(i = 0; i < mario_height; i++) {
	for(j = 0; j < mario_width; j++) {
		if(mario_data[i][j] != 0) {
			FillRect(10 * j + offset, 10 * i + offset, 10, 10, mario_color[mario_data[i][j]]);
		}
	}
}offset是马里奥显示位置的偏移值,mario_width和mario_height就是马里奥像素图的宽高,后面的不说了…下载源代码里会有一个ScreenShot的函数,这个是用来截屏,图片(.tga格式)会保存到记忆棒根目录。直接编译运行源码的话,退出时会截图,届时小p左下角的橙色灯会不断闪烁,请大家不要惊慌!
点此下载本章的源文件psp-subject-03.zip,编译后放进psp仲找到Subject-03运行
效果如下图
good night!💤

《我也来做PSP游戏[3] - 为游戏增添色彩》 由 Shingwa Six 创作,采用 知识共享署名-非商业性使用-相同方式共享 4.0 国际许可协议进行许可。